
Today we are going to look at the LibGDX Controller extension. I will show you how to add controller support, specifically support for the XBox 360 controller, because it seems to be a widely used gamepad.
Adding controller support
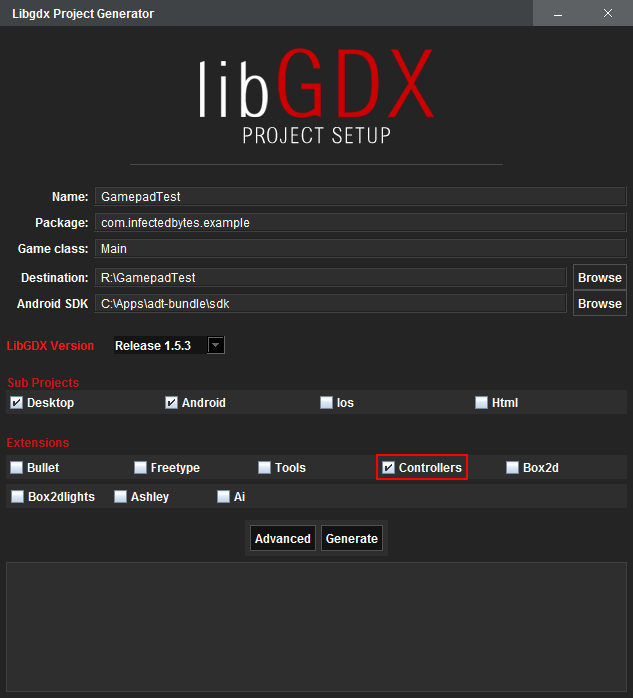
The easiest way to add controller support, is to add it at the project creation.
Start the LibGDX setup and make a checkmark at the Controllers-extension.
If you already have a project, you could add the extension manually. Go to your root project, open the build.gradle file and modify all project dependencies (Core, Android, …).
...
project(":desktop") {
  dependencies {
    ...
    compile "com.badlogicgames.gdx:gdx-controllers-desktop:$gdxVersion"
    compile "com.badlogicgames.gdx:gdx-controllers-platform:$gdxVersion:natives-desktop"
  }
}

project(":android") {
  dependencies {
    ...
    compile "com.badlogicgames.gdx:gdx-controllers:$gdxVersion"
    compile "com.badlogicgames.gdx:gdx-controllers-android:$gdxVersion"
  }
}

project(":core") {
  dependencies {
    ...
    compile "com.badlogicgames.gdx:gdx-controllers:$gdxVersion"
  }
}

...
Getting all Gamepads
For testing purposes we want to know which controllers are connected.
If there are no gamepads connected or they are powered off, you may not get any output.
for (Controller c : Controllers.getControllers()) {
  System.out.println(c.getName());
}
You may get a surprising output. A XBox 360 Wireless Controller is not shown directly, but instead the Wireless Receiver is recognized as a controller. This is just because the real controller is connected via this receiver, so the receiver is used as a controller. But that’s no problem. Additionally you may see other devices as controllers, like 3D mices. My output looks like the following:
SpaceMouse Pro Wireless Receiver
SpaceMouse Pro Wireless
Controller (Xbox 360 Wireless Receiver for Windows)
3Dconnexion KMJ Emulator
Don’t get the controller via
Controllers.getControllers().get(0). You don’t know if the first controller is a real gamepad or just a 3D mice.
If you want to use a controller, you should make sure that there are devices.
The easiest way is to go through the list of connected controllers and check their name. If there is no controller we support, we could fetch the first controller or fallback to keyboard.
Array<Controller> controllers = Controllers.getControllers()
if(controllers.size()==0){
  //there are no controllers...
} else {
  Controller pad = null;
  for(Controller c : controllers) {
    if(c.getName().contains("Xbox") && c.getName().contains("360")) {
      pad = c;
    }
  }
  if(xbox==null){
    //no xbox controller found
    //we could fallback to the first controller, like so:
    //pad = controllers.get(0)
  }
}
Not every XBox 360 Controller has the same name! Depending on the version there might be some little differences. So you should make a check like the above one.
If you want to poll a button or axis, you need to know it’s code.
Most gamepads uses the axiscodes 0 to 3 for the two analogsticks and the buttoncodes 0 to 3 for the four “mainbuttons” (A, B, …).
But that’s not always the case. Additionally the mapping may vary depending on the platform it is used. The Ipega Bluetooth Controller uses the buttonscodes 0 to 3 on Windows, but the codes 96, 97, 99 and 100 on Android.
If you’re using the XBox Controller, you could use the following mapping:
public class XBox {
  public static final int BUTTON_A = 0;
  public static final int BUTTON_B = 1;
  public static final int BUTTON_X = 2;
  public static final int BUTTON_Y = 3;
  public static final int BUTTON_LB = 4;
  public static final int BUTTON_RB = 5;
  public static final int BUTTON_BACK = 6;
  public static final int BUTTON_START = 7;
  public static final int BUTTON_LS = 8; //Left Stick pressed down
  public static final int BUTTON_RS = 9; //Right Stick pressed down

  public static final int POV = 0;

  public static final int AXIS_LY = 0; //-1 is up | +1 is down
  public static final int AXIS_LX = 1; //-1 is left | +1 is right
  public static final int AXIS_RY = 2; //-1 is up | +1 is down
  public static final int AXIS_RX = 3; //-1 is left | +1 is right
  public static final int AXIS_TRIGGER = 4; //LT and RT are on the same Axis! LT > 0 | RT < 0
}
The triggers are only recognized correctly by the XInput-Interface, but LibGDX makes use of DirectInput. So both triggers are recognized as one axis.
There are two different methods for getting the state of a button or axis.
Polling and Event-based input.
Polling Controller State
Once you have a Controller instance, you could poll the current state. A controller can have different components:
- Buttons: Typically the “normal” buttons (A, B, X, Y, …), but sometimes a hat switch is also recognized as a button. They are either pressed or released.
- Axes: Usually provided via analogsticks. Their value is between -1 and 1.
- POVs (Point-Of-View): A group of buttons, describing discrete directional states (north, south, …). Their values are taken from the
PovDirectionenumeration. - Slider: The API doesn’t say much about these. They are either true or false and may discribe On-Off switches.
- Accelerometer: Motion sensor, which gives a
Vector3. Most controllers don’t have one.
To get the actual state of a component, you just use the corresponding method.
public void render() {
  if(pad!=null) {
    if(pad.getButton(XBox.BUTTON_A)) {
      //jump
    }
    speedy = pad.getAxis(XBox.AXIS_LY);
    speedx = pad.getAxis(XBox.AXIS_LX);
    //...
  }
}
The polling is easy to use, but it could become unhandy in large constructs. When polling a controller, you might lose some changes. The Event-based input method guarantees that you get every chane.
Event based Input
In this case we register a listener, whose methods are called if a change is made. This approach guarantees that we get every single change. You could add a listener to a specific controller instance or you could add it to the Controllers class, to receive the events of all controller instances.
pad.addListener(new ControllerAdapter() {
  @Override
  public boolean buttonDown(Controller controller, int buttonIndex) {
    return false;
  }
  @Override
  public boolean buttonUp(Controller controller, int buttonIndex) {
    if(buttonIndex == XBox.BUTTON_A) {
      //jump
    }
    return false;
  }
  @Override
  public boolean axisMoved(Controller controller, int axisIndex, float value) {
    if(axisIndex == XBox.AXIS_LX) {
      speedx = value;
    } else if(axisIndex == XBox.AXIS_LY) {
      speedy = value;
    }
    return false;
  }
  @Override
  public boolean povMoved(Controller controller, int povIndex, PovDirection value) {
    return false;
  }
});
You might have noticed that some of these methods return a boolean. This is used if multiple listeners were registered on the same controller. Every listener will be called, as long as false is returned. If a controller returns true this event will not be propagated to the next listener.
Controller (Dis-)connects
The ControllerListener interface contains the methods connected and disconnected. But unfortunately these methods are only working on Android.
If a controller loses connection, you could pause the game and show a message to the user. If the controller is connected again, a new instance is created.
And that’s all for now! If you have any questions or suggestions, please leave a comment!