
A portable gaming station needs an integrated controller. In this blog post I will start with the basics of the gamepad development.
Arduino Leonardo/Micro
First of all the Arduino Micro is basically just an Arduino Leonardo in a much smaller form factor. They both have 20 digital IO pins of which 7 can be used as PWM outputs and 12 as analog inputs. But what makes them “better” than other Arduino boards? Why do I want to use an Arduino Micro?
One nice thing is the small form factor. But the most important part is that the Micro is based on the ATmega32u4 microcontroller, which has built-in USB communication. This allows the Micro to appear as a mouse, keyboard or joystick to a connected computer! Therefore I don’t have to write any complex device driver. It will just work, without any hassle :)
The parts
Ideally the integrated gamepad should have all buttons and axes of a normal, modern gamepad, like the famous XBox360 controller.
Therefore it should have:
- 2 thumbsticks, each one consisting of an x and y axis
- 2 analog triggers
- 1 hat switch (or POV or D-Pad)
- 10 buttons (ABXY, Start, Back, LB, RB, LS, RS)
Okey, the 10 buttons and the hat switch are easy, I could just use ordinary push buttons for those, nothing special.
The triggers are something special. I haven’t found a real solution yet. Of course I could just use normal buttons, but I really, really want to have them analog (like real triggers), but that’s not an easy task. I will try to solve this problem and I will keep you up to date.
The thumbsticks are easy again, but there I have different options:
Joystick
Basically a real thumbstick, with each axis going from 0 to 1023. Furthermore it also has a push button, just like the XBox thumbsticks. So it has a nice range, good automatic centering and a pushbutton! Really nice, but there is a little downside. It is kind of big for a portable gaming station.

PSP Joystick
This is a replacement part for a PSP. Of course the size is much better for a portable gaming station, but it doesn’t have a pushbutton :(
Furthermore its range is a bit small, it goes from about 160 to 820. The automatic centering is really bad, the centered state goes from 490 to 540, so even if you don’t touch it, it might be a bit beneath the real center.

Which one?
Actually I would love to use the real thumbstick, because its range is better, the centering is better, …. everything is better, except that it is a way bigger than the tiny PSP joystick. At the moment I am a bit undecided, but I tend to use the real joystick. Maybe I will later decide to use the PSP version, but we will see this later.
And here a little comparison of the dimensions:
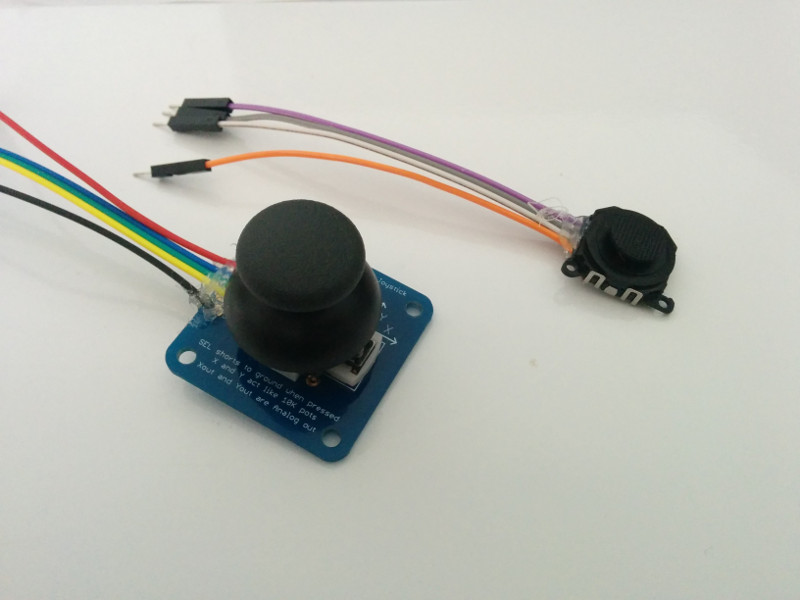
- Left one: 38mm * 38mm * 34mm
- Right one: 19mm * 19mm * 9mm
Not enough pins!
You may have noticed that this setup would consume all Arduino pins (14 buttons + 6 analog axis). So there’s no way to add any more buttons or any outputs. That’s really bad, because I’d like to add a switch button for different modes, like a normal gamepad mode and a keyboard mode, in which I could control the mouse via a thumbstick.
Luckily the solution is really simple (and cheap). I just use shift registers. A single shift register has 8 digital inputs, while itself only uses 4 of your Arduino pins. Furthermore you can daisy-chain several of them by still only consuming the same 4 pins as before. Therefore I can use 16 buttons with only 4 pins, awesome :)
There are several shift registers out there, I used the 74HC165 and I also wrote a little library for it:
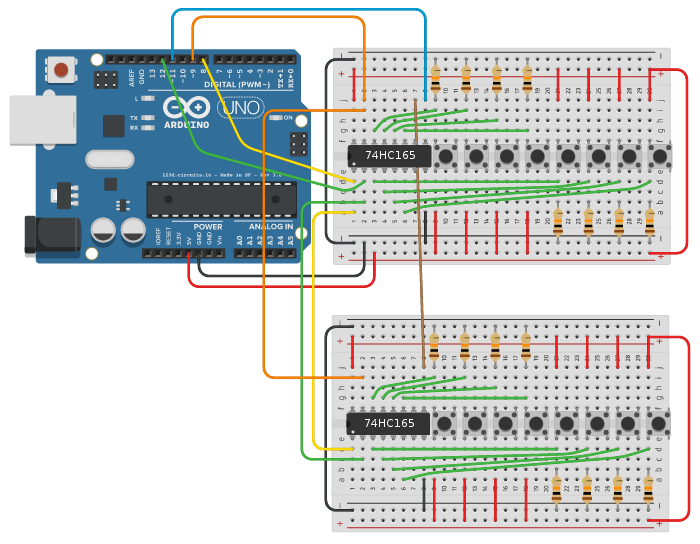
Test wiring
For testing the shift registers I build a little test setup with my Arduino Uno and used my library.
The example code is super simple:
#include <ShiftIn.h>
// Init ShiftIn instance with two chips.
// The number in brackets defines the number of daisy-chained 74HC165 chips
// So if you are using only one chip, you would write: ShiftIn<1> shift;
ShiftIn<2> shift;

void setup() {
  Serial.begin(9600);
  // declare pins: pLoadPin, clockEnablePin, dataPin, clockPin
  shift.begin(8, 9, 11, 12);
}

void displayValues() {
  for(int i = 0; i < shift.getDataWidth(); i++)
    Serial.print( shift.state(i) ); // get state of button i
  Serial.println();
}

void loop() {
  if(shift.update()) // read in all values. returns true if any button has changed
    displayValues();
  delay(1);
}
Whenever I press or release a button, the state of every buttons is send via Serial.print.
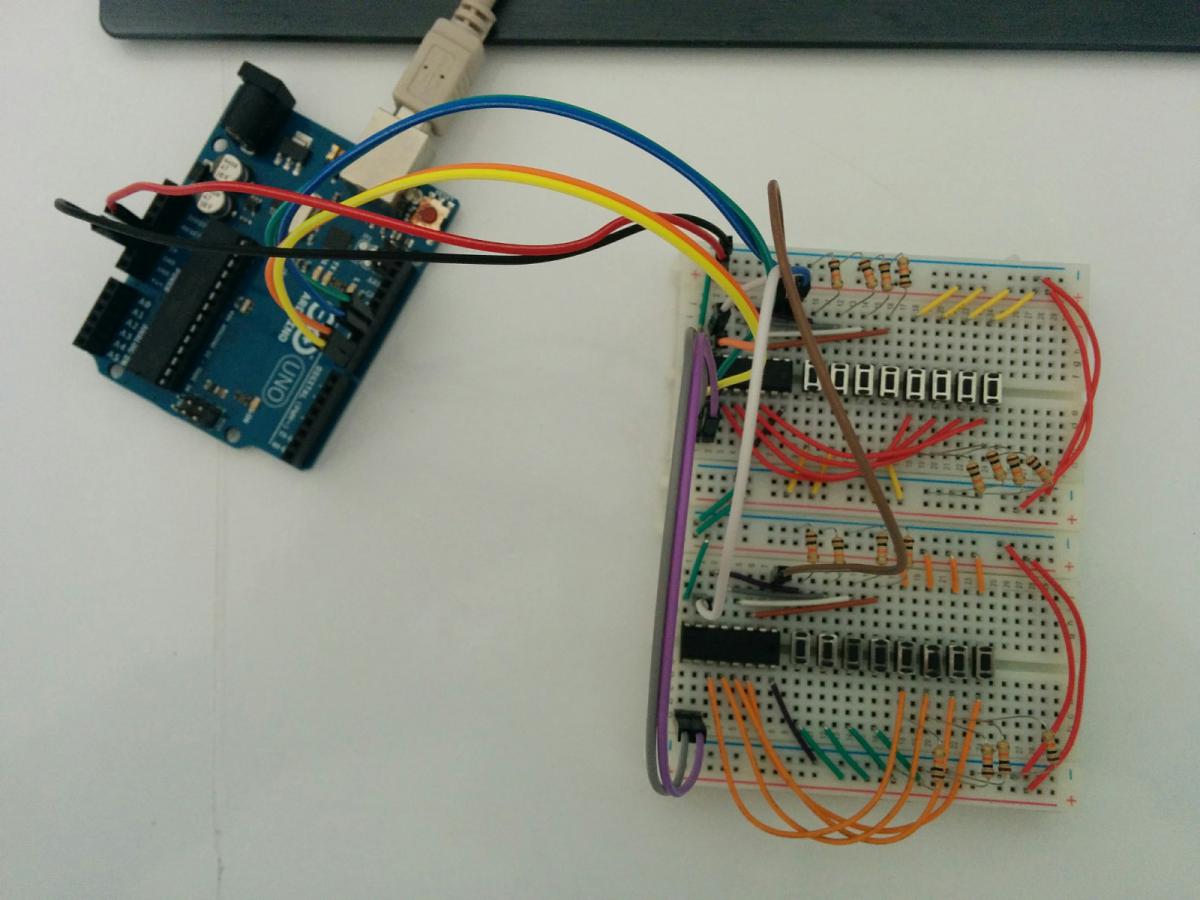
And here the real world example with small buttons:
To be continued
In the next post I will write more about the analog axes and I will show you another microcontroller that is also based on the Atmega32u4, but that is even smaller than the Arduino micro. See you next time :)